How to Print Phone Photos Without Cropping the Edges
The Print Project, No. 2
This installment of The Print Project is a quick-start guide to help you get beautiful prints without spending a fortune — and without losing the edges of your favourite photos.
If you haven’t read the first entry in the series, I highly recommend starting with it here: The Print Project Begins: How to Set Your Favourite Photos Free from Your Phone
By the end of this post, you’ll be ready to order your first batch of cheap, meaningful photo prints — and know exactly what sizes to pick.
Common Cropping Errors (and What to Watch Out For)
Even if you’ve selected a size and sent your photos off to print, the final result might not be quite what you expected. Here are three common outcomes — and how they happen:
Issue 1: The edges are cropped off
This is by far the most common problem. Most printers (especially online services) default to cropping the image so that it fills the page — edge to edge.
Why? Possibly because it looks more “complete” when there’s no white border, but the trade-off is that important parts of your image can be lost at the top, bottom, or sides.
Issue 2: The image is smaller, with blank space around it
This one happens less often, and usually only if you’ve chosen it as a setting — such as “fit to page” or “keep original proportions”. The whole image is printed, but it sits within a white border or frame, often unevenly. Some people prefer this, but it’s not the default.
Issue 3: The image is stretched or distorted
Notice how everything appears wider than in the other photos. This is especially obvious when you look at the people.
This is the least common — but the most jarring. It usually only happens with home printing. The photo is forced to fit the print size by stretching it either vertically or horizontally. The result? Everything looks weird: people look wider, circles become ovals, and the whole image feels “off”. Most professional services won’t do this — but if you’re printing at home or uploading to older kiosk machines, it’s worth checking for.
Choosing the Right Print Size (And What on Earth Is an Aspect Ratio?)
So what size should you print your phone photos?
You’re probably already familiar with the classic ‘photo print’ — the standard 6×4 (six inches by four inches). Print sizes are almost always measured in inches, with the longer side first. Because 6×4 prints are so common, they’re widely available and very cheap to produce.
But here’s the catch: if you’re printing photos taken on your smartphone, you’ll get a better result by choosing a 5×3.5 print instead. This size has become increasingly popular, and in most cases it costs exactly the same as a 6×4.
I know — it sounds counterintuitive. Why choose a smaller size? Because it fits your photo better. A 6×4 print will crop part of the image, while a 5×3.5 keeps more of it intact. Even better, if you’re ordering from Snapfish, you can select a 5.3×4 print, which almost perfectly matches the aspect ratio of most phone cameras. Similarly, Photobox offers a 5×3.75 option that does a similar job.
Example 1: Original Photo VS 6X4 Print Crop Vs 5.3x4 Print Crop
Make sure to consider what you are doing with these photos. If you are filling a 6X4 photo album then the smaller print sizes will have space around them. Which could be a deal breaker for you. Don’t worry I get it, you want it to fit snugly and look great.
Photo frames also pose a similar problem, however unlike with albums you can buy frames for the previously mentioned sizes. Or you can make your own mount and border to make it work with an existing frame size. I’m not going to delve any further in this blog post. It will feature in an upcoming post though!
If that already solves your problem, brilliant — you’re good to go. But if you want to understand why cropping happens and how to avoid it completely, read on.
Why Your Phone Photos Keep Getting Cropped
Here’s the technical bit — which helps explain why cropping happens at all.
Most smartphones — including iPhones, Google Pixels, Samsungs, Huaweis, and others — take pictures in a 4:3 aspect ratio. This is the default for nearly every phone on the market. That said, it’s worth double-checking yours just in case — you can Google something like:
[Your phone model] camera aspect ratio
The issue is that standard 6×4 prints use a 3:2 ratio. That means your photo doesn’t naturally fit the print size — and has to be cropped to do so. That’s why parts of the image go missing unless you plan around it.
Want to Avoid Cropping Altogether?
To keep everything in the frame, you need to print at a size that matches the original 4:3 aspect ratio. Here are some sizes that do that:
4×3 (rare – not widely offered)
5×3.75 (offered by Photobox)
5.3×4 (offered by Snapfish)
8×6 (more expensive, but commonly available)
12×9, 16×12, 24×18 (all suitable but increasingly expensive and less common)
Bear in mind: smartphone lenses usually aren’t designed to produce sharp large-format prints. In my experience, anything above 12×9 pushes the limit. These cameras are meant for screens — not walls.
And of course, larger prints also mean higher costs — for printing, paper, and postage. So if you’re aiming to keep things affordable, I recommend sticking with one of the following:
5×3.5,
5×3.75,
5.3×4,
6×4
How to Crop Your Photos in Advance
If you’re printing in a size like 6×4 or 5×3.5 and don’t crop your photo beforehand, the lab will do it for you — and you might not like the result.
Some services let you adjust the crop during checkout, but not all. The easiest way to stay in control is to crop your image in advance using your phone’s editing tools.
On most phones, just open your photo, tap ‘Edit’, then choose ‘Crop’. You’ll often see preset ratios — choose 3:2 for 6×4 prints, or manually enter the size if your app allows.
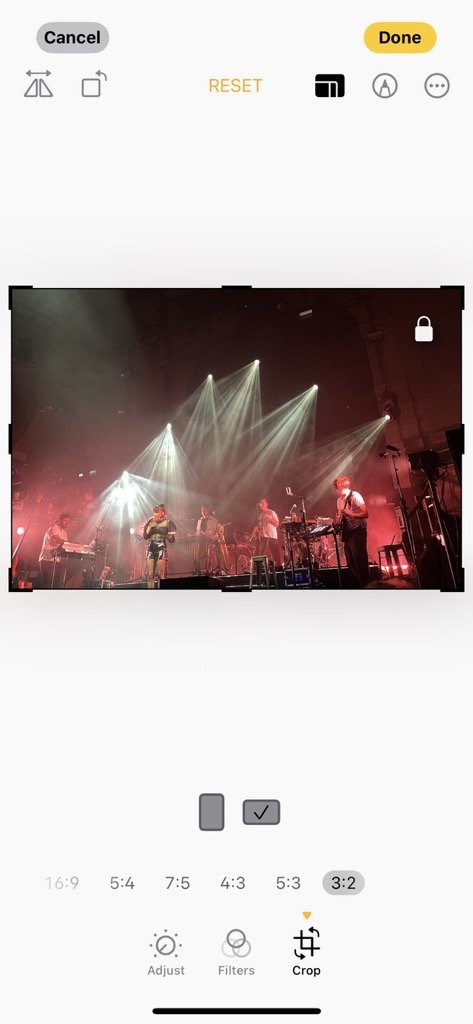
Example above from an iPhone on IOS 18.5. I’m cropping to 3:2 aspect ratio which means It’ll work perfectly with a 6X4 print.
If you use editing tools like GIMP (free), Lightroom, Photoshop, Affinity Photo, or any similar app, you’ll be able to crop to precise aspect ratios with ease.
🔧 Top Tip:
Create a “To Print” album on your phone or computer. As soon as you’ve finished editing a photo for print, add it to this album. That way, you’ll have everything ready to go when you place your order.
What’s Next?
In the next installment of The Print Project, I’ll walk through the best places to actually get your photos printed — both online and in-store.
To make sure you don’t miss it, sign up to my newsletter below and get the latest updates as soon as new posts go live.